CategoriesChess Midgame

Chess Basic Tactics Series #6 – X-Rays and Windmills

In this post of the tactics series I’ll discuss X-rays and windmills. Despite their descriptive names, these two tactics are relatively rare. Let me say if you succeed in trapping your opponent in a windmill you can win his entire army!

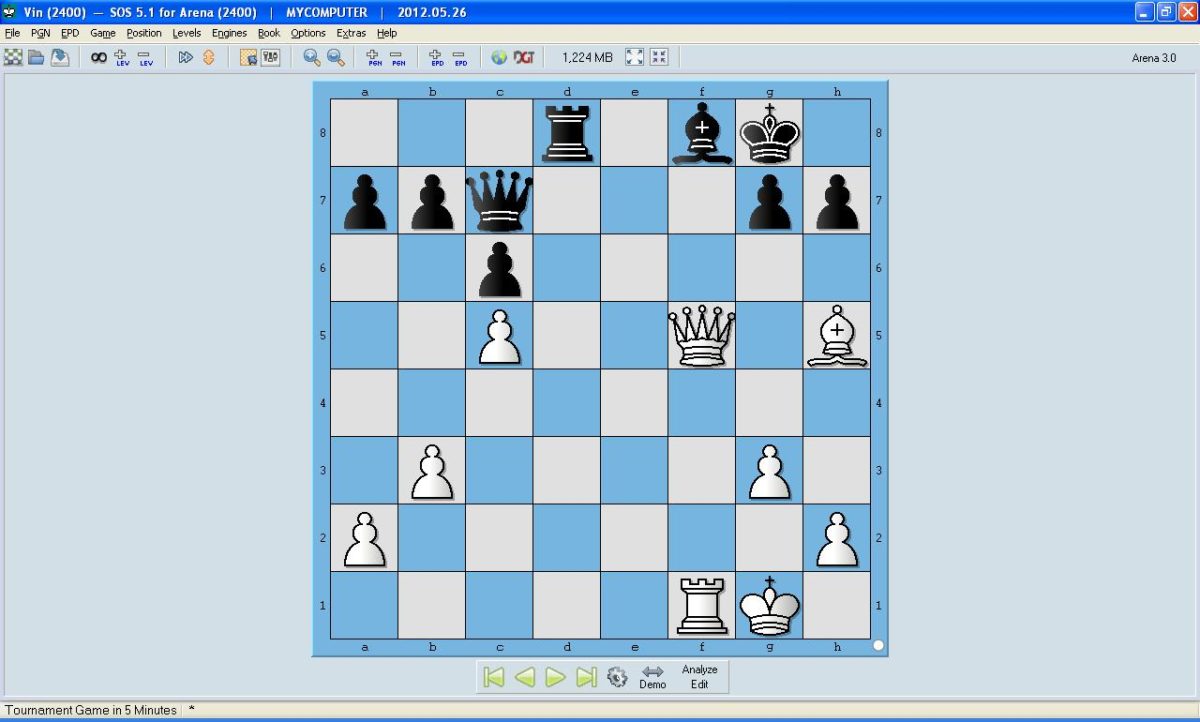
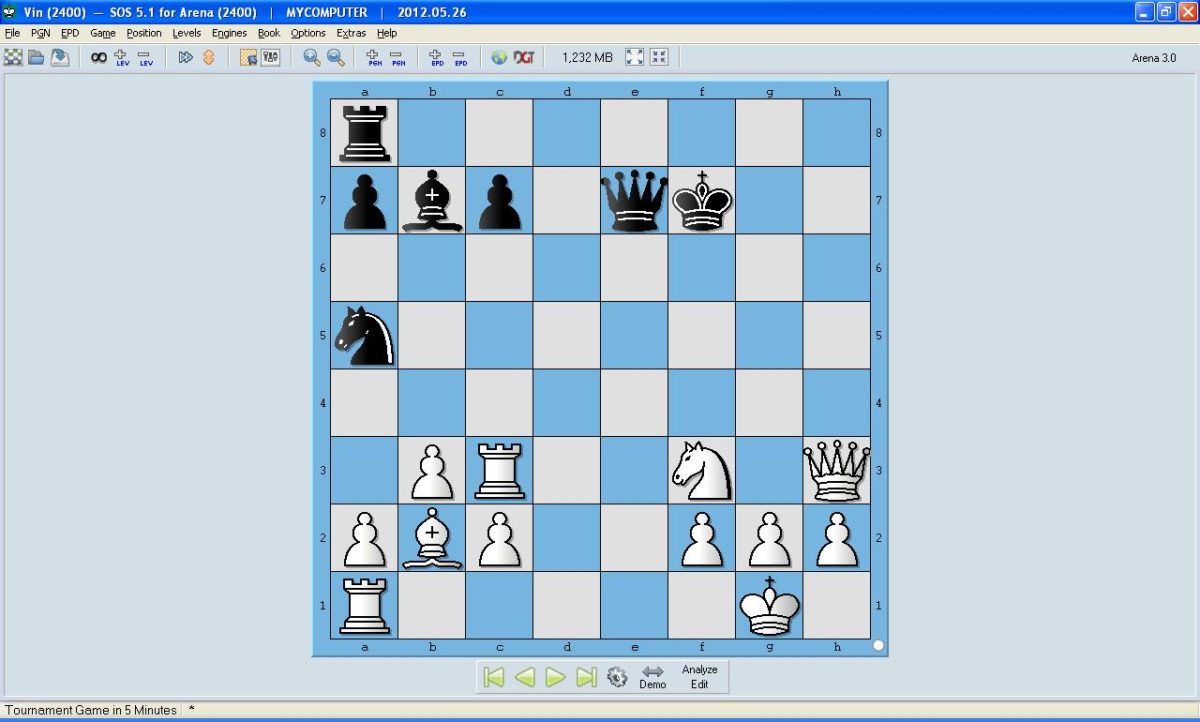
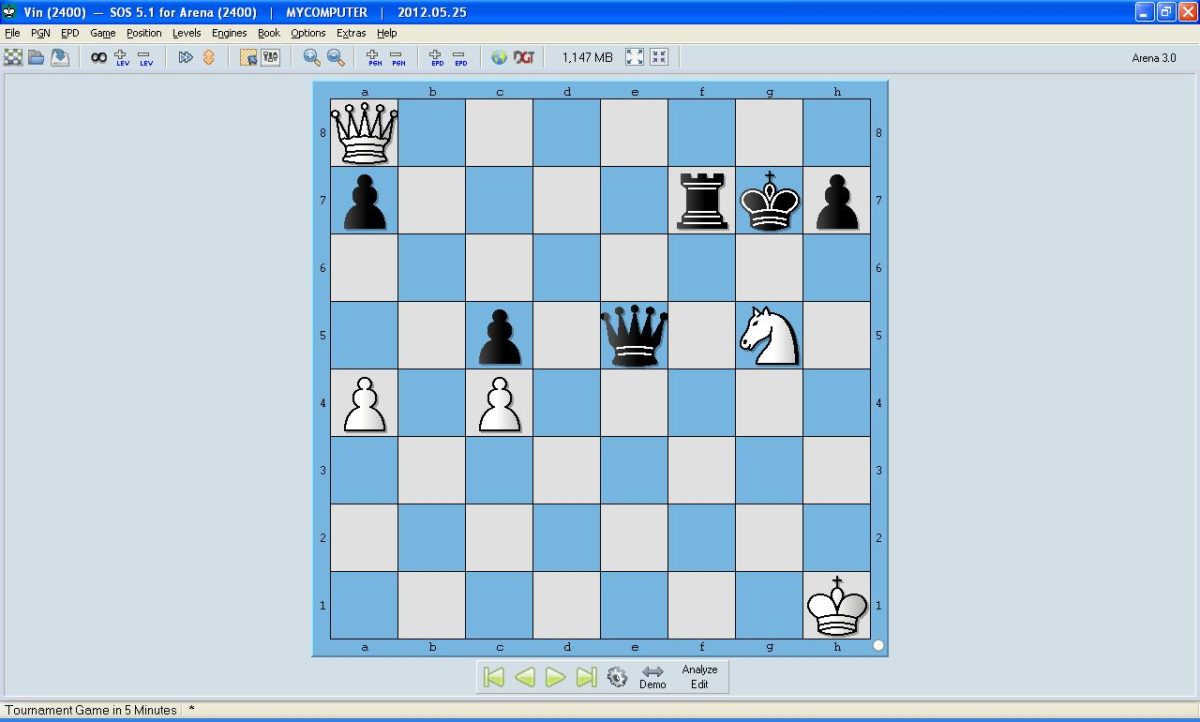
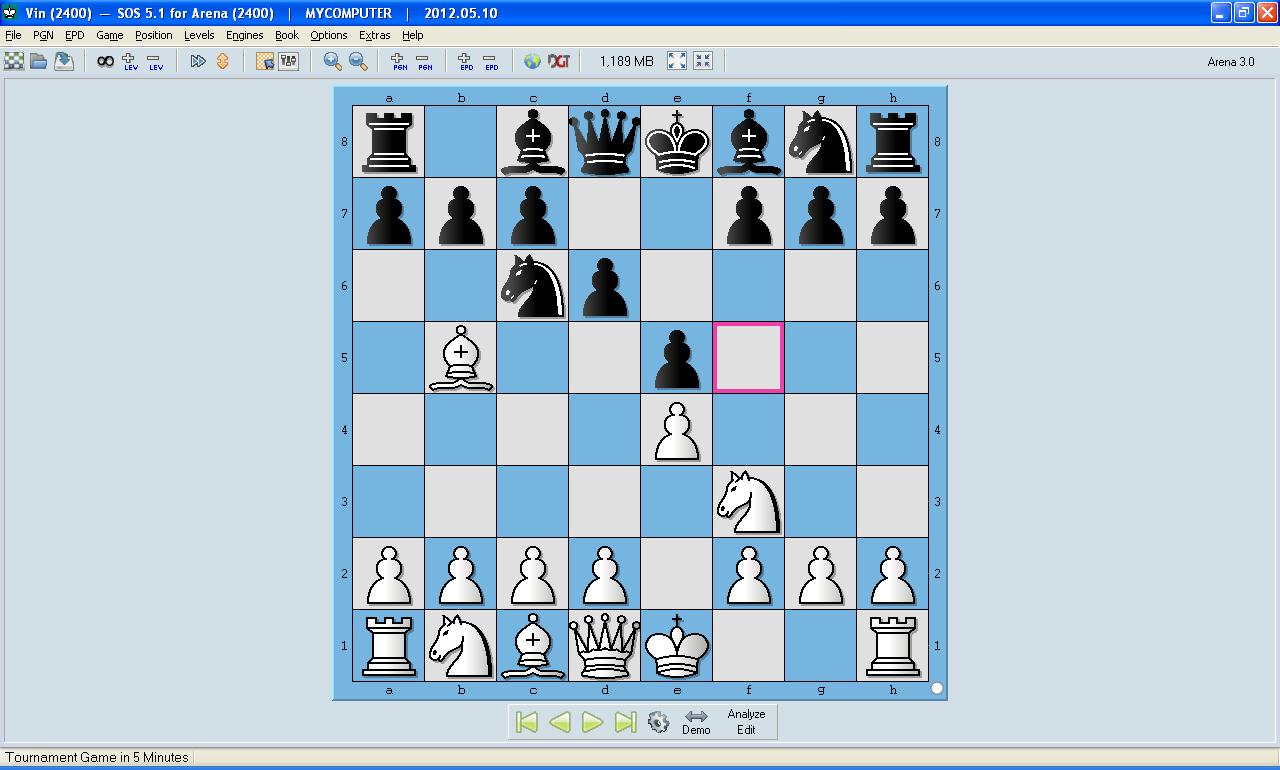
The X-ray tactic occurs when a piece ‘sees through’ an enemy piece towards a certain target. Let’s look at an example:

Here notice the white rook on the d-file. At first glance it looks like the d8 square is adequately protected by black. However whites rook is really attacking that square by ‘seeing through’ black’s rook on d7. White plays 1. Qxd8! which leads to checkmate. As I mentioned, the X-ray is not seen too frequently in games. However it is important to notice how closely this tactic is related to the pin. In this case black’s rook on d7 is pinned to defense of the d8 square.

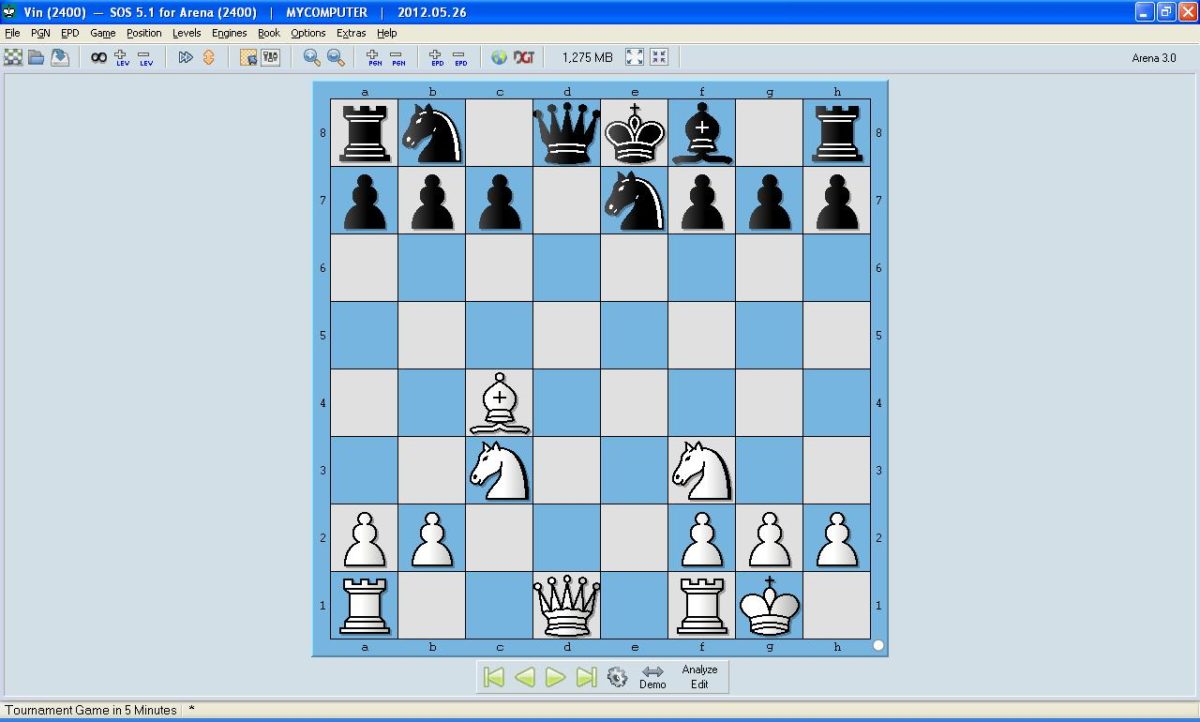
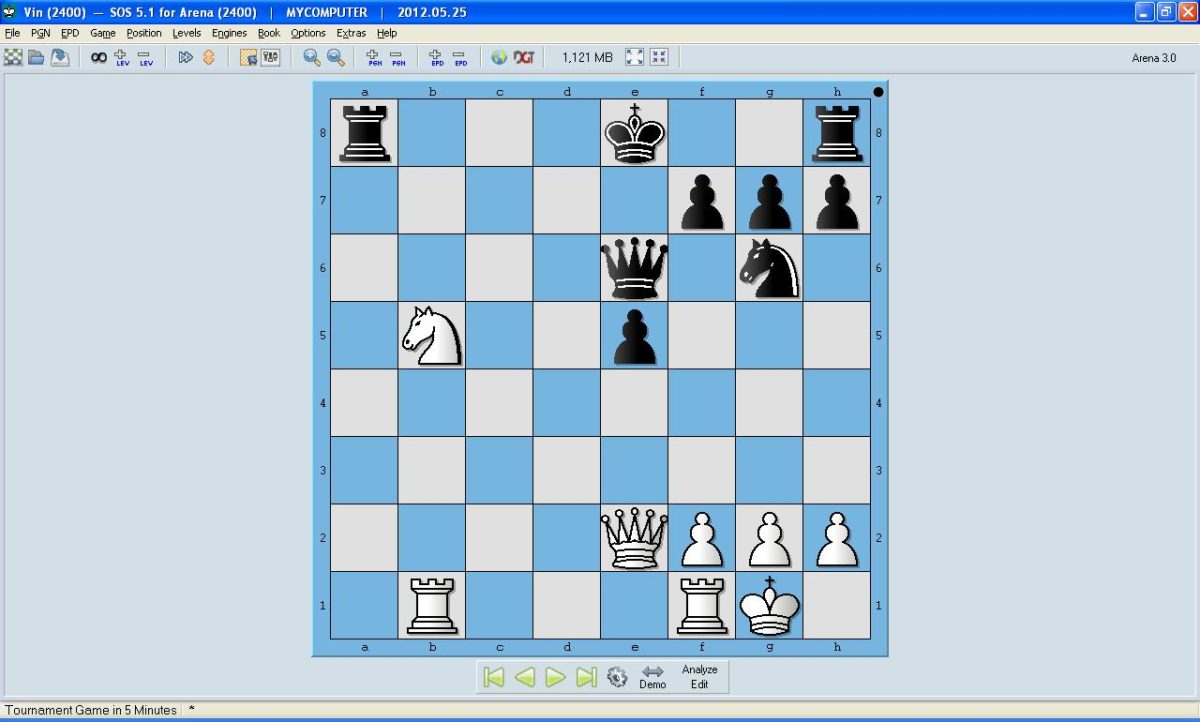
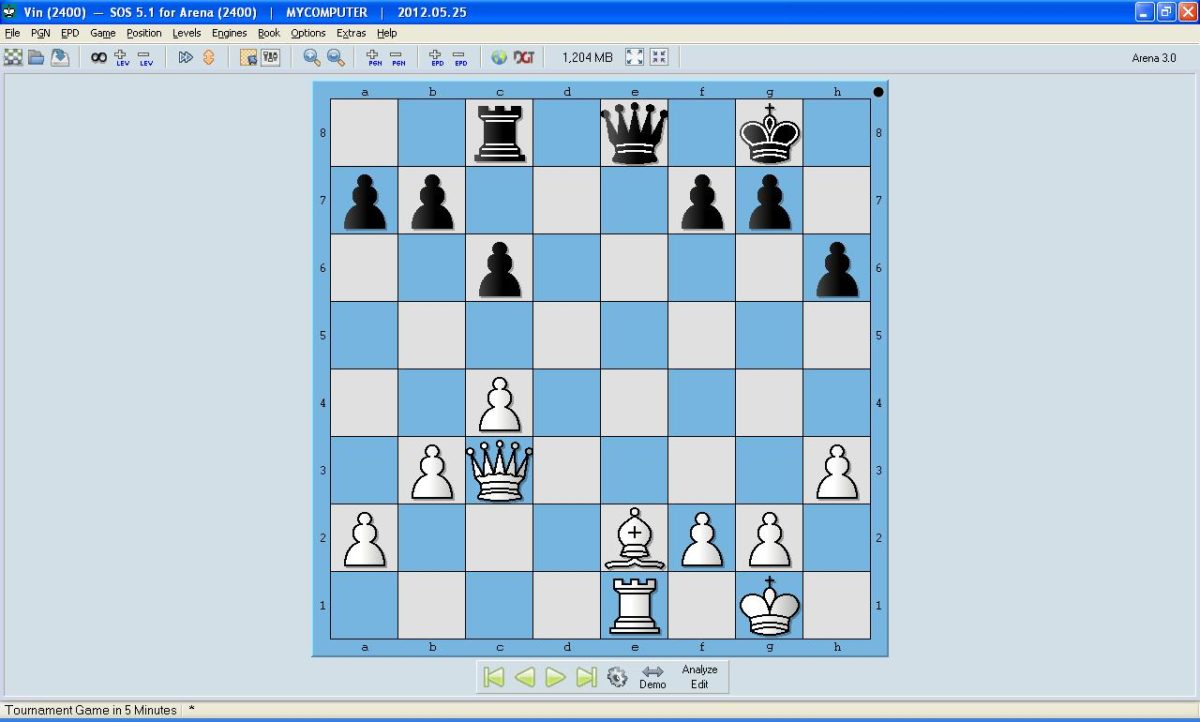
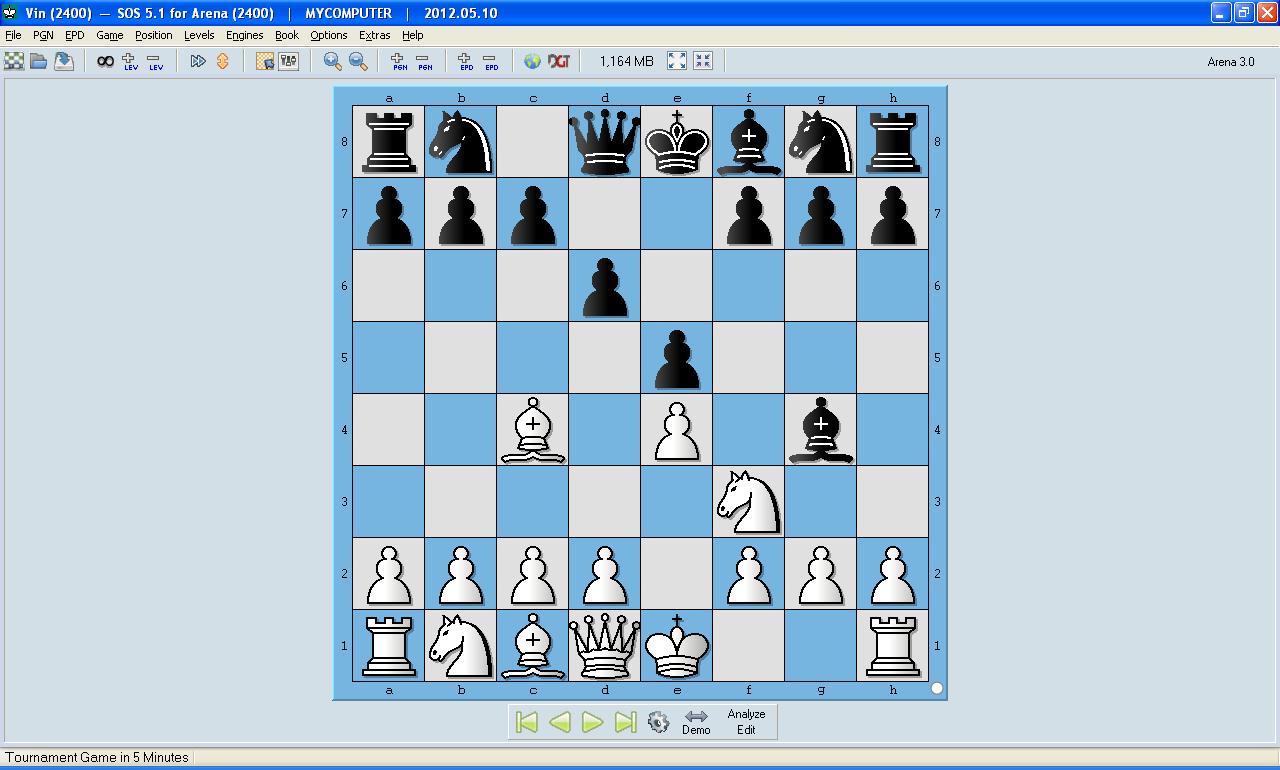
Although rarely seen, the windmill is one of the most powerful tactics in chess. It’s a series of checks and discovered checks where the opponent has no time to escape. The following diagram is an example of a long combination. Try to practice your visualization by seeing as far as you can.

Here white plays 1. Bf6! and black responds with 1…Qxh5.  Then the following moves occur:
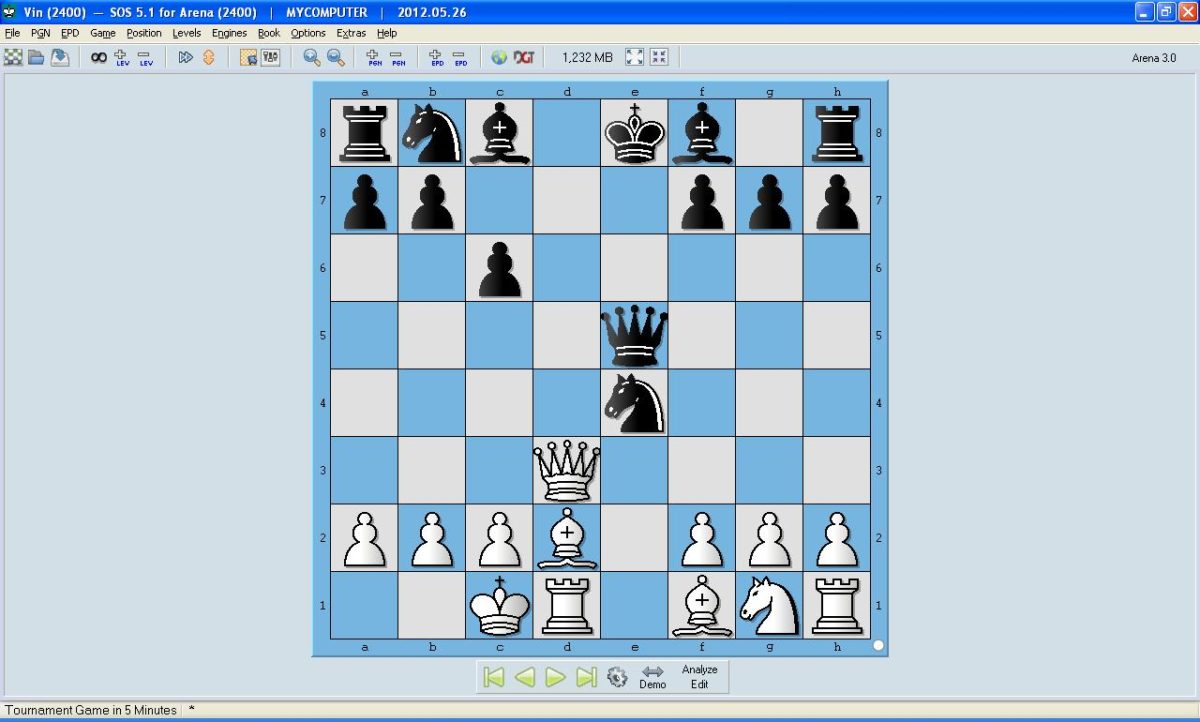
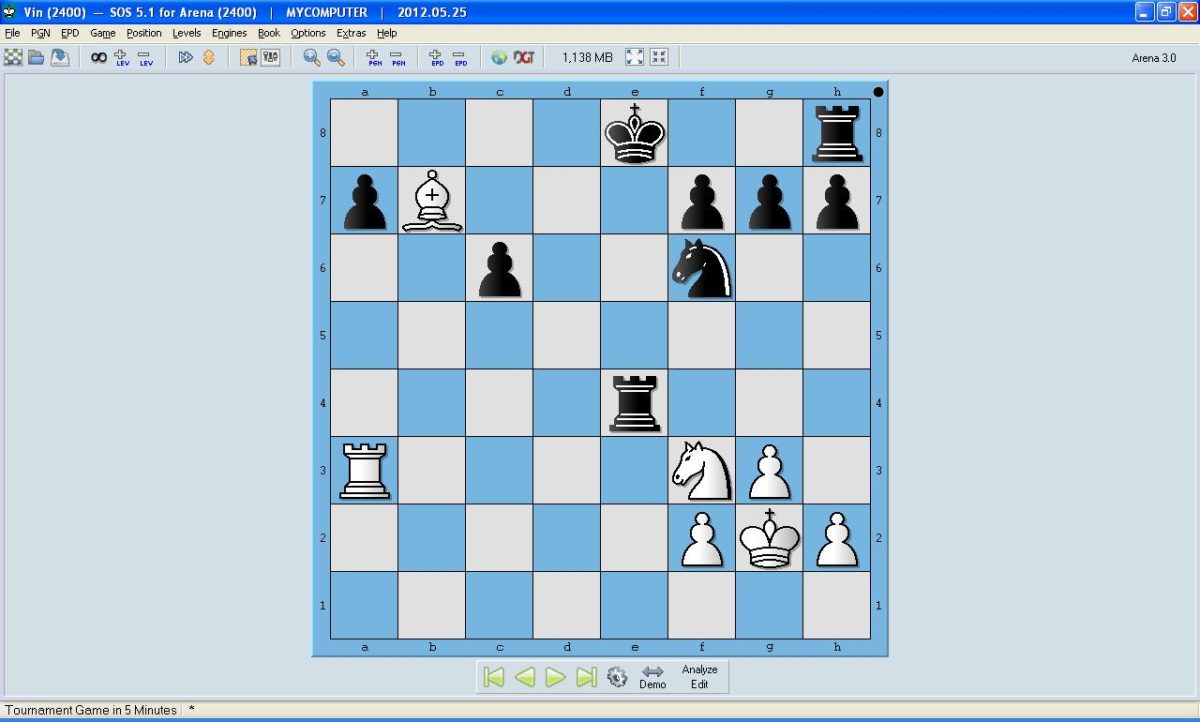
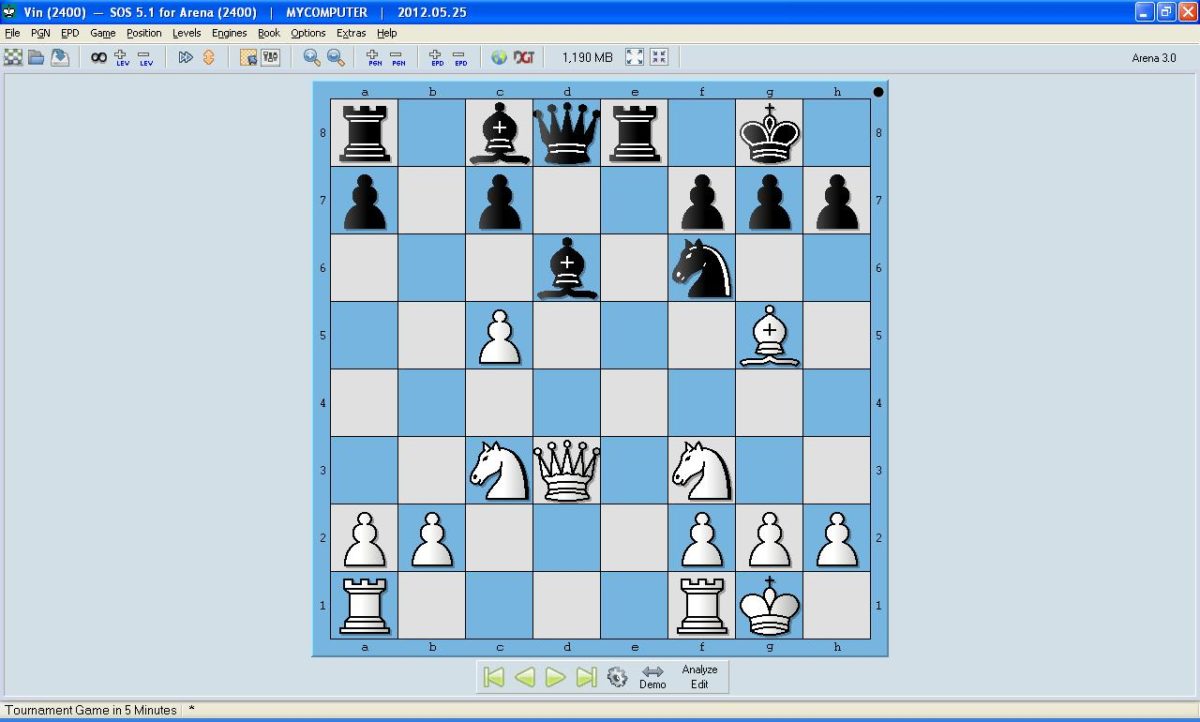
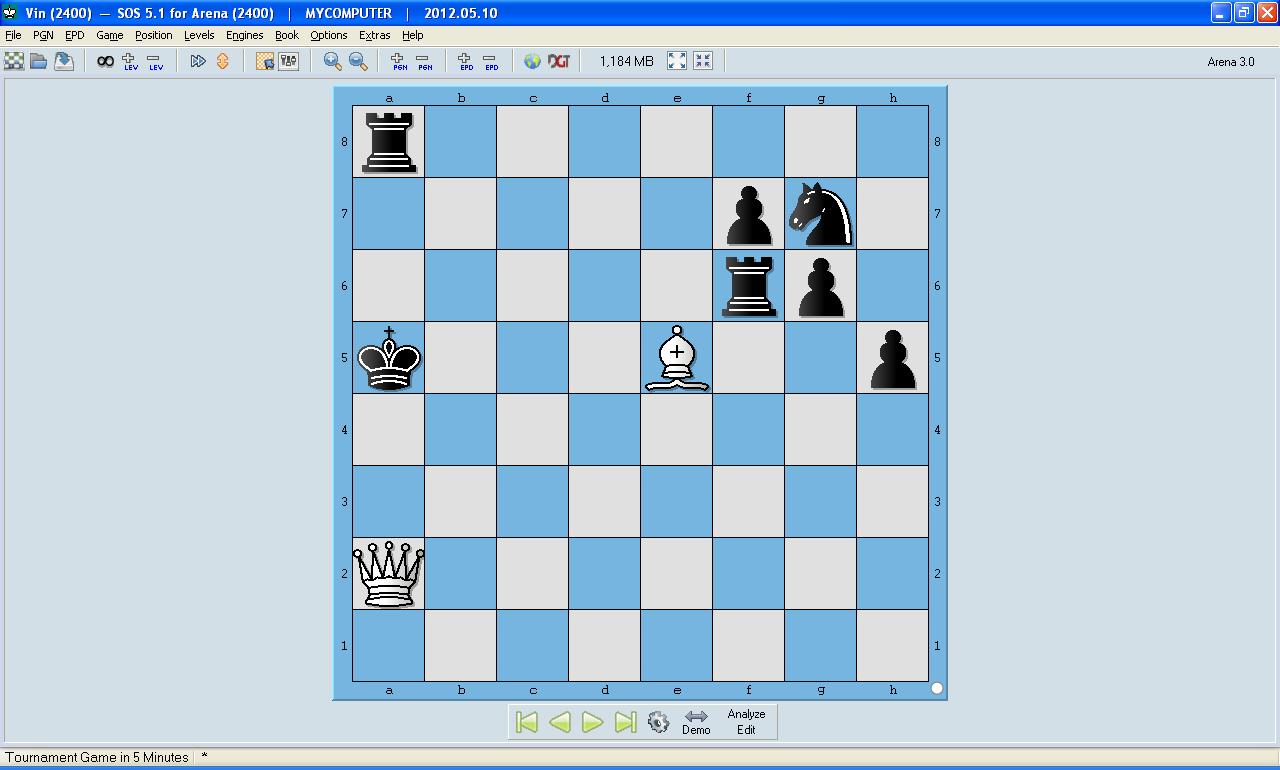
2. Rxg7+ Kh8

3. Rxf7+ Kg8

4. Rg7+ Kh8

5. Rxb7+ Kg8

6. Rg7+ Kh8

7. Rg5+ Kh7

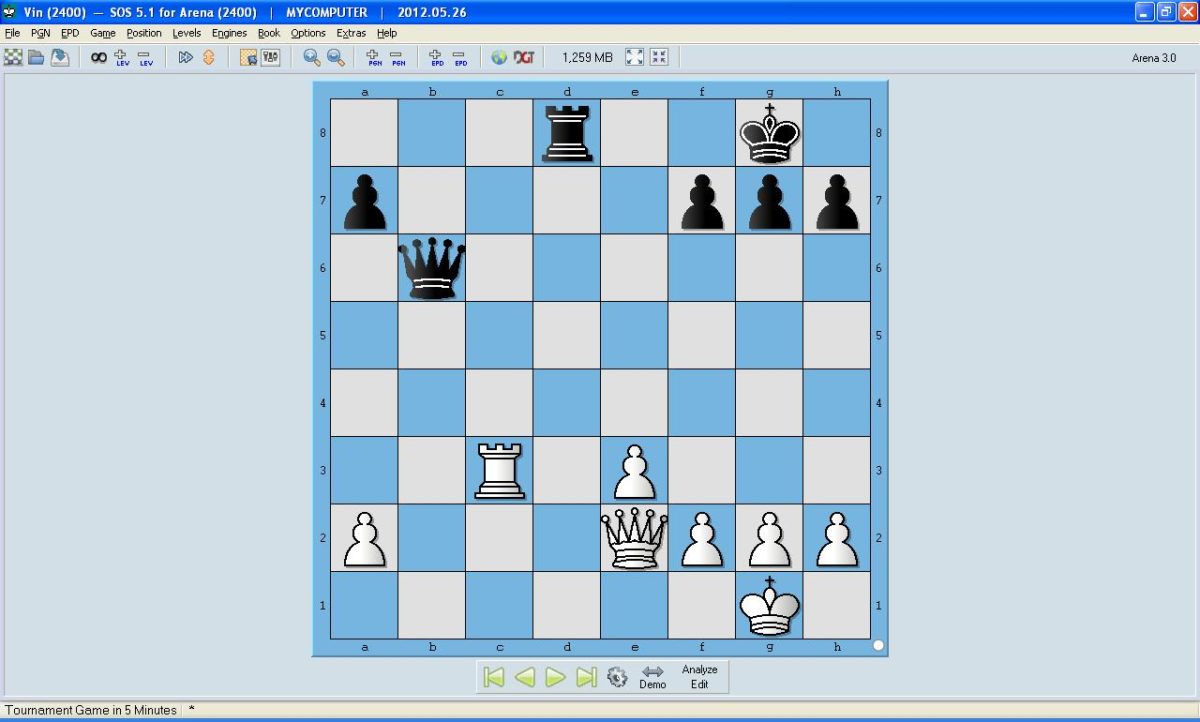
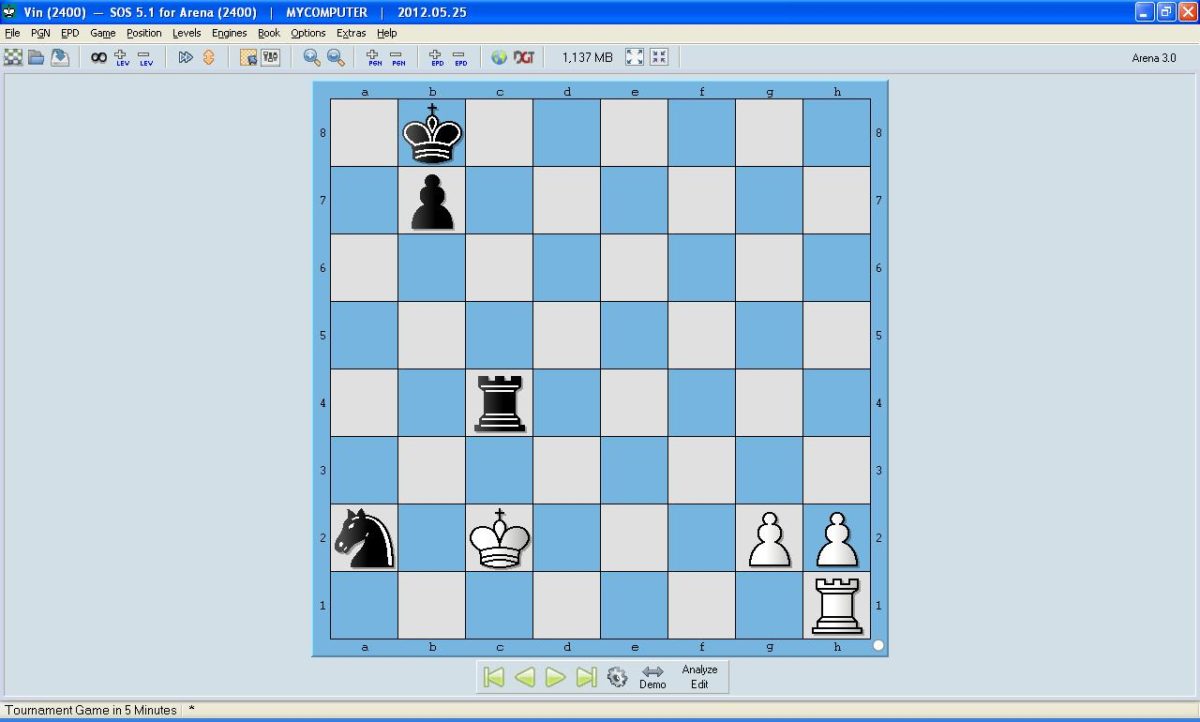
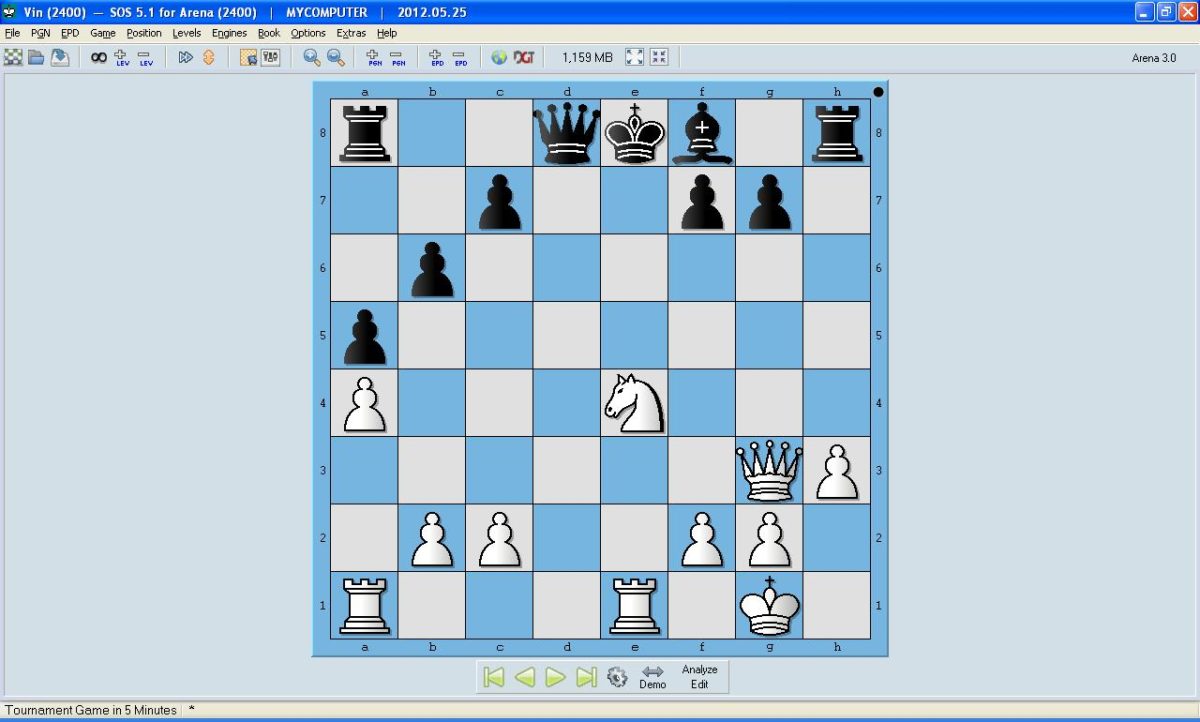
Then we are left with the diagram below:

Notice how the rook moved back and forth and caputured the enemy pieces. Also notice how the black king was unable to escape the devastating discovered checks. In the next move white will capture blacks queen.

I hope that everyone enjoyed this tactics series and gained some knowledge from it. It’s not enough however to just study the diagrams in these posts you must practice consistently to improve your tactical play. That takes solving lots of puzzles and analyzing your games. In the next post I will provide several puzzles that contain the tactics we have discussed for you to solve!

CategoriesChess For BeginnersChess MidgameChess Puzzles

Chess Basic Tactics Series #5 – Clearance and Interference

In my opinion these two tactics are overlooked and not studied in enough detail. Imagine that you’re in the middle of a tough chess match. You notice that you can make a strong capture or check, unfortunately however one of your own pieces is in the way. That’s where a clearance sacrifice comes into play. We sacrifice one of our own pieces to clear a square, rank, or diagonal. Here two examples.

If whites rook were not in the way he could play 1. Qg7#. So how can white clear his rook out of the way? He can simply move it, but that would give black time to defend. There is one move however that leads to blacks defeat quite quickly. That move is 1. Rh7+. No matter how black captures, white plays Qg7#. A common theme in clearance sacrifices is to move the obstructing piece out of the way with check. Since our opponent must deal with the checking move it allows us to accomplish our goal. In the next diagram we can see an example by the great player Mikhail Tal.

It’s unfortunate for white that his queen is on the e6 square. If she weren’t there then white could play the knight fork Ne6+(remember forks?) Is there a solution to this problem? Tal thought there was and found 1. Qxf5! White captures the knight and clears the square at the same time. After this move black resigned.

Interference is a tactic where we disrupt the harmony of the enemy forces. Here is the classic example of interference from a brilliancy prize game.

White has some bank rank threats. Unfortunately blacks rook seems to be defending the bank rank fine. Richard Reti found a way to breakthrough with 1. Bf7+ Kh8 2. Be8!! There is no defense to the threat. Notice how whites bishop interferes with blacks bank rank defense. Interference tactics are somewhat rare, but they do happen. Interference can really be likened to the opposite of a clearance sacrifice. We put one of our pieces in harms way to accomplish a certain goal.

CategoriesChess Midgame

Chess Basic Tactics Series #4 – Deflection and Decoy

As Christmas gets nearer, I thought we should continue with our series covering basic tactics. First let’s just do some quick definitions so we can get a basic understanding of these two tactics. Deflection is exactly what you would think. An enemy piece is guarding an important square or piece. If we can find a way to successfully deflect this piece we will either win material or checkmate. This tactic occurs frequently with backrank threats.  Usually there is a piece that is protecting our opponents back rank, if we can only deflect this piece we either win material or checkmate.  Let’s see how this works in practice.

It’s blacks move. We can see that white’s backrank is weak. If whites queen were not where it is, black could play 1. … Re1#. So our idea is to deflect the queen from defense of the bank rank. How can we do that? Here Jose Raul Capablanca played 1. …Qb2! White has no defense to either checkmate or loss of material. White cannot play 2. Qxb2 because of Re1#. As an exercise try to work out the other variations until black has a winning advantage and you completely understand how this move wins. Let’s look at another example of deflection.

It’s white’s turn to move. Notice how blacks queen is only protected by her king. If there was a way to deflect the king from protecting her, we could play Qxd8. Here white plays 1. Bxf7+. Since 1. …Kxf7 is forced white plays 2. Qxd8 and wins blacks queen.

Now let’s look at the decoy. The idea is that we want an enemy piece on a particular square. So we play a move that forces the enemy piece to that square. Let’s look at a classic example of decoying that every chess player should know by heart. It shows a decoy, double check, and a queen sacrifice!

It’s white turns to move. Notice that if we could somehow get blacks king to the d8 square we can unleash a powerful double check. Here white plays the decoying move 1. Qd8+!!. Black is forced to play 1. …Kxd8. After which white plays 2. Bg5++ with mate to follow.

Many times the decoy tactic is used in conjunction with the skewer. Let’s see how this can work.

If blacks queen were further away from her king, white could play the 1. Qh7  skewer. So we need to decoy the queen to a square that is farther away. White does this by playing. 1. Rxc7. This pins blacks queen, and black has nothing better than to play 1. …Qxc7 after which white plays 2. Qh7+.

As you review your own games look for opportunities where these tactics arise. By playing often, analysing your games, and solving tactical diagrams, your ability to recognize tactics and combinations will quickly increase.

CategoriesChess Midgame

Chess Basic Tactics Series #3 – Double Attacks/Forks

In my last post I discussed discovered attacks. Technically, discovered attacks and discovered checks are forms of double attacks. I decided to do two separate postings because this tactic is so common and important. Learning the exact terminology isn’t the goal here, what’s important is recognizing the patterns and being able to incorporate them into your own games.

A double attack is an attack against two pieces or pawns at the same time. It is also possible to attack a piece and a square at the same time. Typically a fork involves one piece attacking two separate enemy pieces. The knight is the piece most associated with forking, but don’t forget that queens, rooks, bishops, kings, and even pawns can fork enemy pieces! Let’s look at some examples.

Here the white knight seems very menacing in blacks territory. Indeed it is because white plays 1. Nc7+ forking blacks king, queen, and rook! Notice that the knight can only attack squares of the same color. Keep that in mind when you are looking for forking opportunies with your knights.

The following is an example of a bishop fork, see if you can spot the fork before looking below the diagram

Here white plays 1. Bc6+ forking blacks queen and rook. Now let’s look at a king fork!

Here white plays 1. Kb3 and forks blacks rook and knight.

Now that we have a basic idea of forks, let’s do an exercise that’s a little harder. Instead of a one move fork let’s try to create an opportunity.

This diagram is a little more difficult, then the previous ones in this post and series. With that said take some time and study it. Imagine that the black king was on h8, if that were the case then Nf7 would be a fork. Is there a way for us to get there?

The winning move is 1. Qh8+! Notice that this move also skewers blacks king and queen. If black plays either Kg6 or Kh6 then white simply plays Qxe5. Because of this 1 … Kxh8 is forced. Then white plays 2. Nxf7+ forking blacks king and queen. The final fork is shown below.


The above is an example of how to turn simple tactics into multi-move combinations. Remember that the foundations for long combinations are basic tactics. Once you learn the basics by heart, then creating forcing sequences becomes much easier. We will continue our tactical study in the next post!

CategoriesChess For BeginnersChess Midgame

Chess Basic Tactics Series #2 – Discovered Attacks/Checks

In chess the discovered attack is one of the most important tactics. When we first begin playing chess we learn about simple threats. We attack one of our opponents pieces, and they defend. With a discovered attack we are creating two threats at one time. Since our opponent cannot defend against two attacks at the same time, we gain a material advantage. In a discovered attack a queen, rook, or bishop is positioned behind another piece. When that piece moves, it unleashes an attack. Let’s look at some examples to clarify.

In the above diagram it’s white’s turn to move. Notice how if white moves the bishop on e2, the white rook will attack blacks queen. There are a few moves at white’s disposal here, can you spot what the best one might be? Here the best move is Bg5! With this move white simultaneously attacks blacks queen and rook. Black has no choice but to lose material. Let’s keep studying this tactic because it’s incredibly important.

Here it’s blacks turn to move. White has just played dxc5 which was a major oversight. Here black plays 1. …Bxh2+! and white immediately resigned. Since white is forced to deal with the check, black will then play Qxd3 winning whites queen. Notice how in both of the above cases the bishop moved and created a powerful threat. Because of this, the piece that it uncovered was free to capture the enemy piece. When the piece that moves is able to check the enemy king, the discovered attack is even more powerful.

The most powerful form of discovered attack is the double check. This is extremely strong because it checks the enemy king with two pieces. When a king is in double check it is forced to move, as there is no other way to get out of check. Let’s see what this looks like in practice.

Here it’s white’s turn to move. We can see that the knight on e4 has several squares where it can move, unleashing the rook to give check. In this case however white can give double check by moving his knight to either f6 or d6. Here white plays 1. Nf6++ and gives double check and mate. Can you see why this move is superior to Nd6?

I hope you enjoyed this post! In the next part of our series we will discuss double attacks and forks.


CategoriesChess Midgame

Chess Basic Tactics Series #1 – Pins and Skewers

If you’ve read my previous post, then you know that studying tactics is one of the most important things you can do to improve your game. In this series, I’m going to go deeper, define, and give examples of some basic tactics. Before we get into the fun stuff, let me first give some required definitions.

In chess tactics can be defined as short term opportunities where one player makes threats against the opponent.  Pins and skewers, are just two examples of various tactics that are used in a chess game. A pin in chess is when you attack a piece that can not move out the way because it would allow capture of a piece of greater value. There are two types of pins, absolute pins and relative pins. Let’s look at some examples.

This first diagram is an example of an absolute pin. The black knight on c6 is absolutely pinned to the king because the knight cannot move. In chess, it is illegal to move a piece and expose your king to check. Keep in mind that absolute pins are more powerful than relative pins for this very reason, the piece that is pinned is completely stuck!


The next diagram is an example of a relative pin. The knight on f3 is pinned to the queen. Unlike the first example, it is possible for the knight on f3 to legally move. Doing so however would be bad since it would lose the queen which is more valuable than the knight.

One thing to remember is that only queens, rooks, and bishops can pin other pieces.

The next tactic we will discuss is the skewer. A skewer is very similar to a pin, however in the case of a skewer the more valuable piece is in front of the piece of equal or lesser value. When the more valuable piece moves, it exposes the less valuable piece to capture. Just like pins there are absolute skewers and relative skewers. Let’s look at some examples.

The following diagram shows an example of two skewers. The white queen is skewering the black king on a5 and black rook on a8. Since the black king is in check it must move out of the way allowing the capture of the rook. Also, the white bishop is skewering the black rook on f6 and the black knight on g7. Since the rook is more valuable than the knight, when it moves it allows capture of the knight. Just like pins, only the straight line pieces, queens, bishops, and rooks can skewer.


I hope this post helped you get your feet wet with some basic tactics! In the next post in this series we will discuss double attacks. In the meantime start improving your tactics play by solving some chess puzzles!