CategoriesChess For Beginners

Chess Noob #18: Mating with a King and Queen

In the last blog, I covered mating with a King and Rook.  The idea was to box in the opposing King into a smaller and smaller area of squares until in the end you use your king to take away his final square and checkmate with the Rook.

We’re going to use a similar idea to make with a King and Queen.  Some find this easier (since the queen can move in more directions than a rook and can therefore making the King’s remaining squares smaller faster… but some people may have trouble with it (there was a game in the Under 900 section at the World Open where the game ended in a draw because the kid with a King and Queen couldn’t figure out what to do, and ended up stalemating the opposing King).

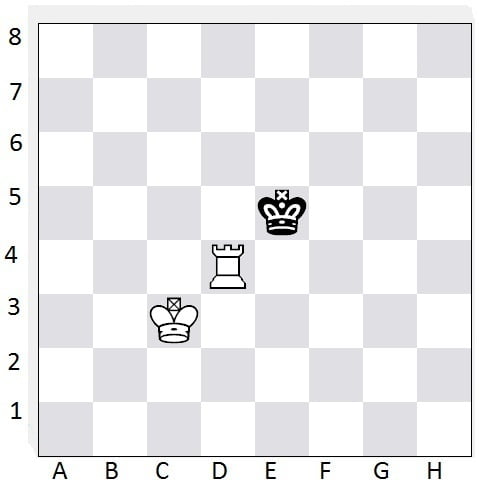
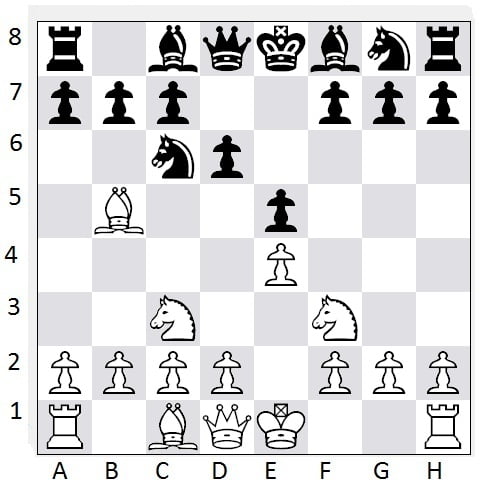
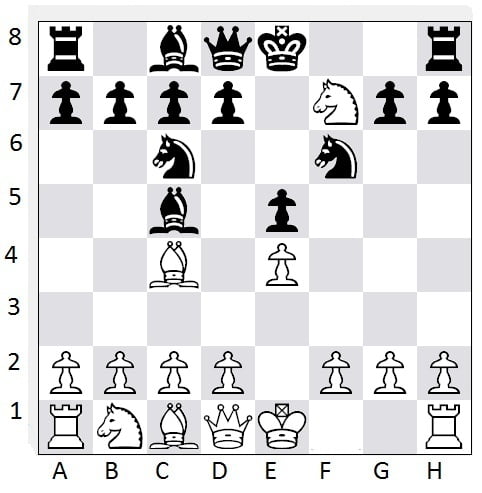
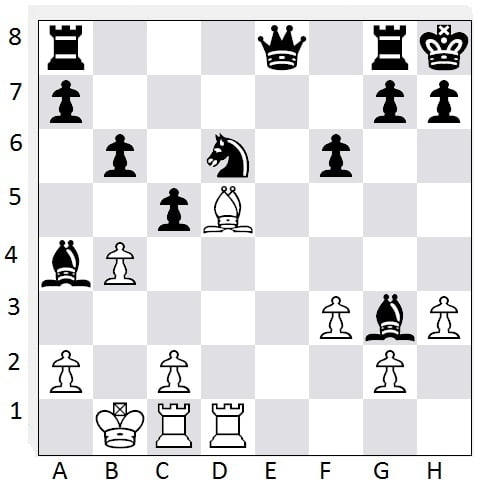
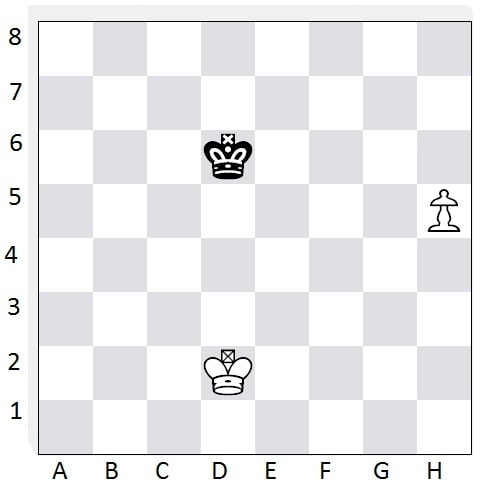
Since I don’t want you to accidentally stalemate your opponent, let’s take a look at what we need to do…  First, I’ll set up a random starting position:

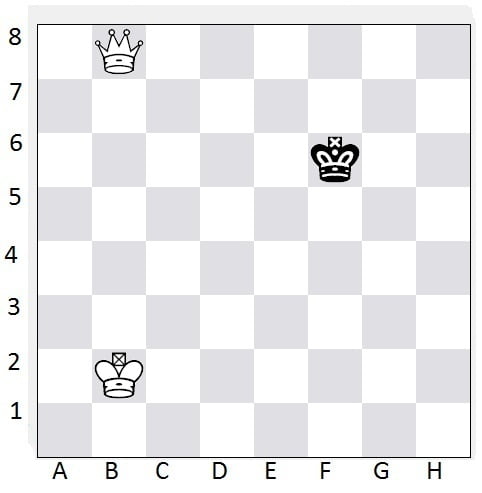
We’ll say that white just queened it’s pawn and then black moved to F6 from E5 after white Checked with the new queen.  It’s now White’s move.  Remember, white wants to take away as many of black’s possible squares as quickly as possible.  There’s no need to endlessly put black in check (if you do 50 checks in a row, it’ll be a draw anyway).  We can’t just keep going back and forth either (as 3-move repetition is a draw), and we have to be careful that in the end, we don’t cut off black’s available squares until just the right time (we don’t want to stalemate black like the unfortunate player at the World Open).

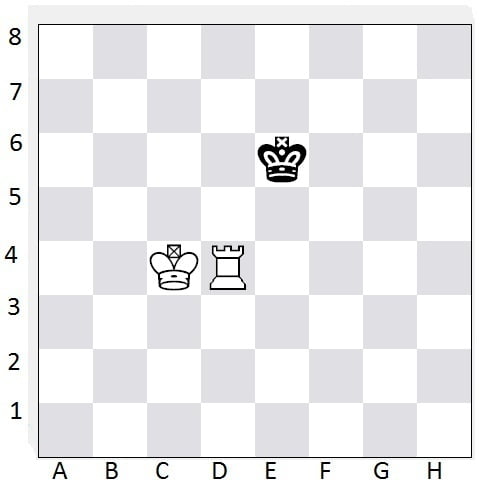
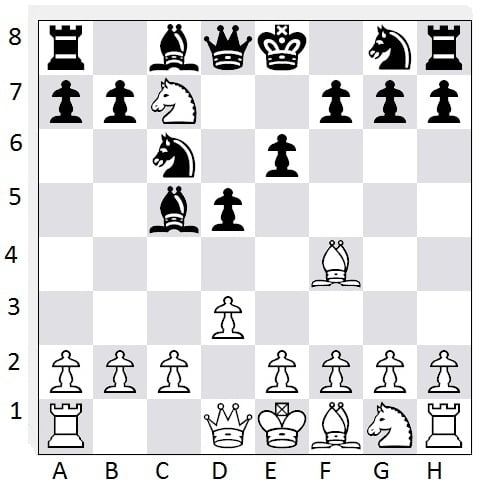
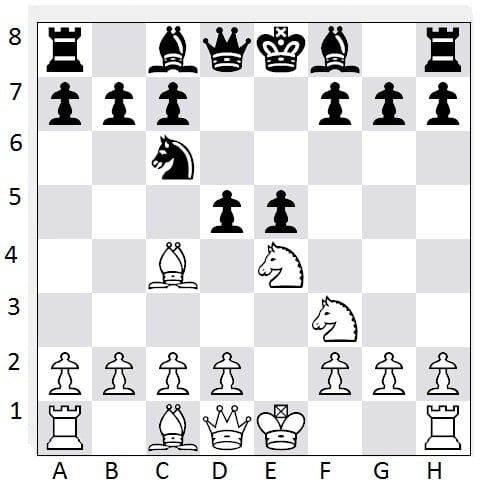
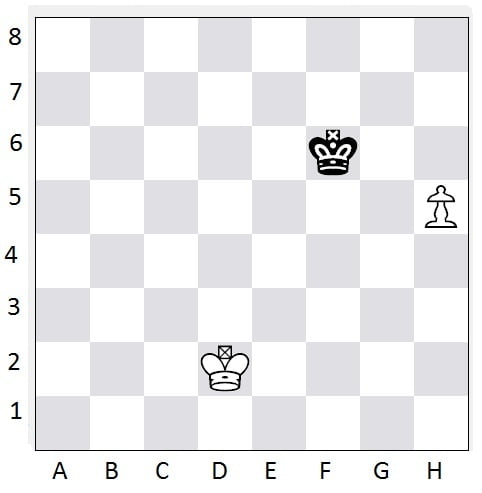
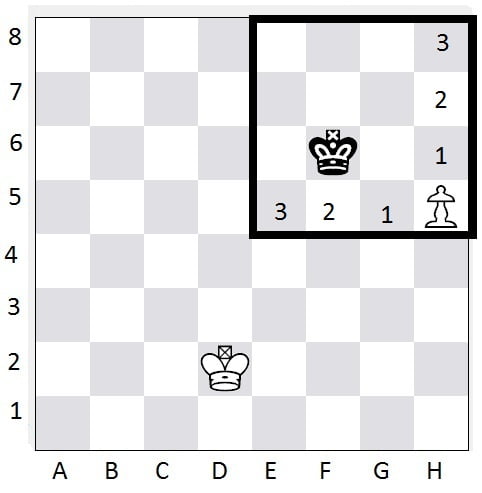
White’s goal here is to corral black into the corner or edge of the board.  In the above position, black is already on the F-file… so let’s keep him confined to F-H by moving the Queen to block the E-file:

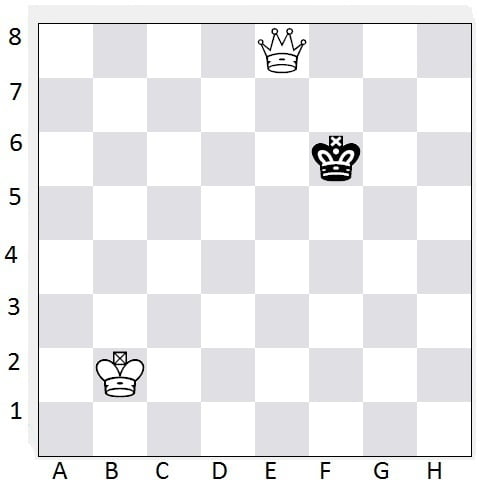
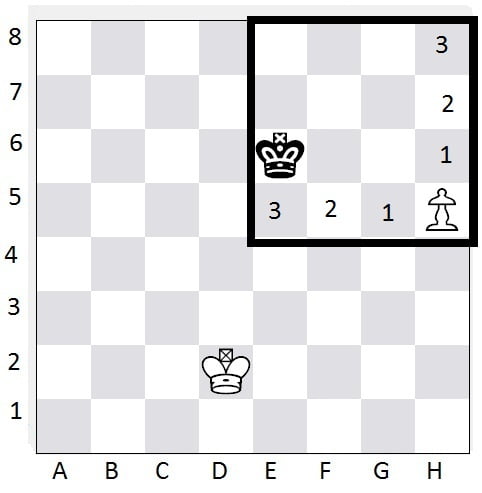
Depending on where black goes, we’ll just cut his squares off more and more.  So if he did Kg7, we’d go Qe6 making black have only 3 squares left to go to.  if he goes to g6 or g5, we’ll go to f8 to take another file away.  if he goes to f5, we’ll do Qe7 to make the space smaller.

Eventually, we’ll want to bring our king into the game, but not until we can’t take away more space with the queen.

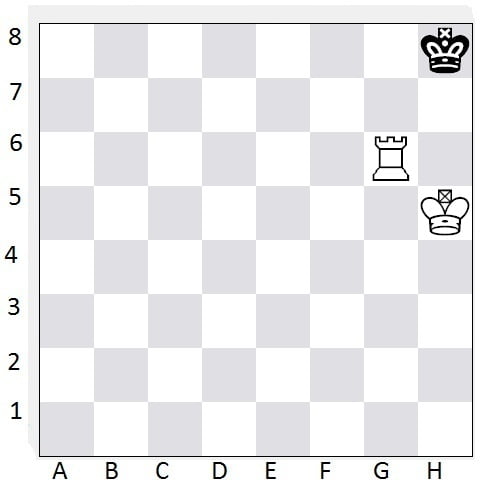
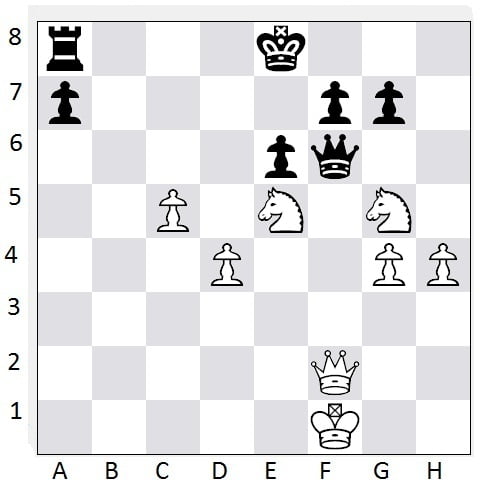
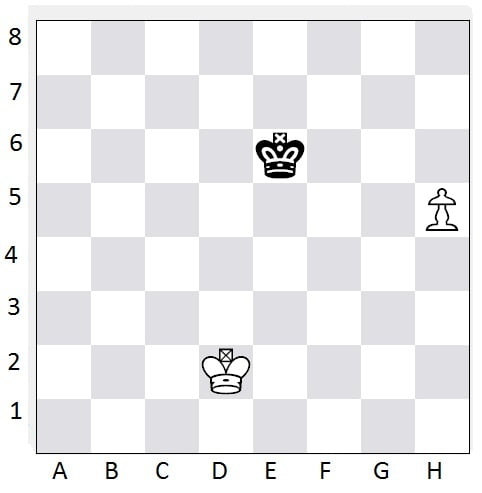
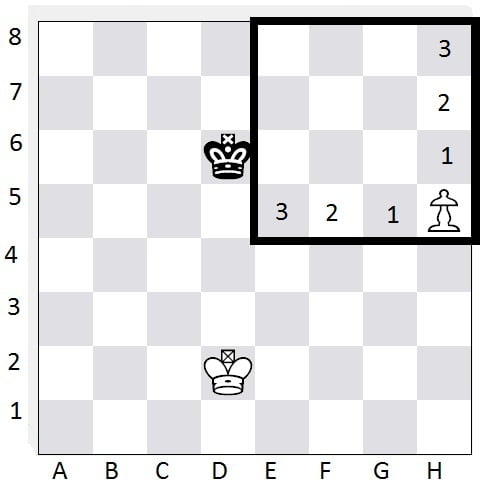
Here’s a position, while playing against my chess computer where I finally have to start bringing my king over:

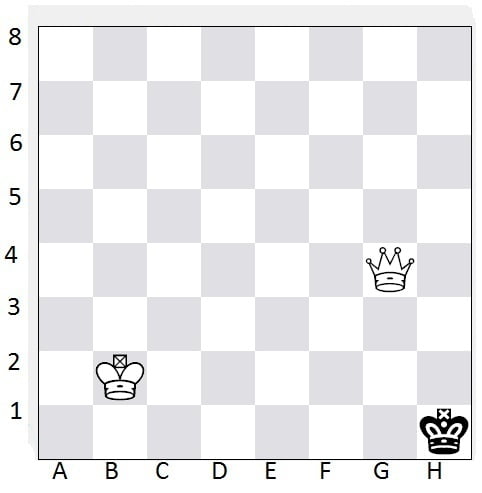
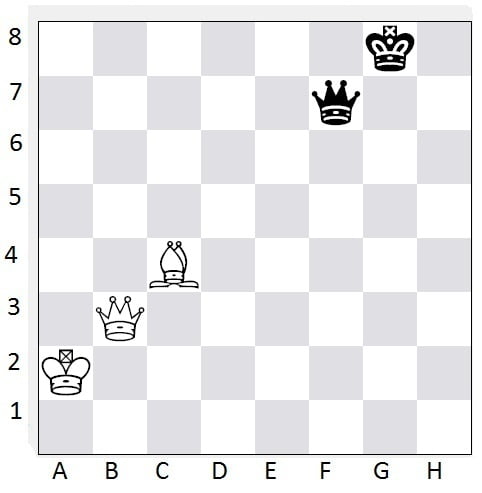
Do you see WHY I now need to bring my King over?  If I move Qg3, I take away the last of black’s squares but without checking him, so it’s a stalemate/draw.  I don’t want a draw, I want a win.  And I can’t go Qh4+, Qh3+, or any other Queen move for that matter, because it will allow black to get his King out of the little cage I’ve placed him in.  And I don’t want that.  So now, with black having only h2 to go to, it’s time to start walking my King over, forcing Black to go Kh2, Kh1, Kh2, Kh1 back and forth until my King gets to his area..

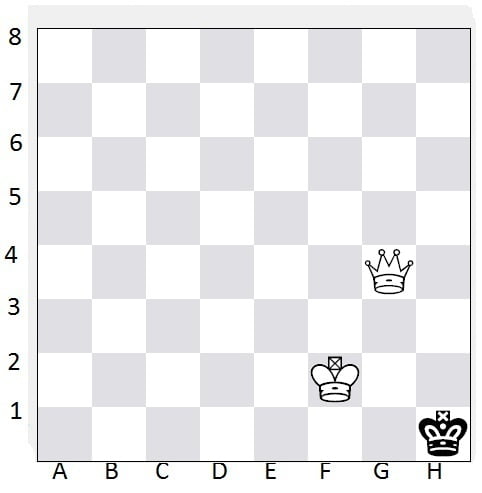
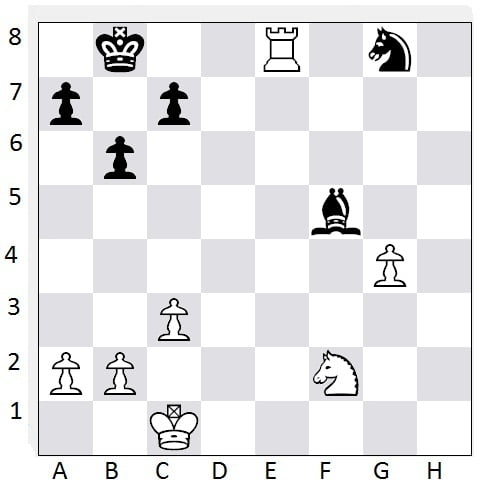
and now that the black king is wedged in place, we can mate with Qg2#:

Have a topic you want me to cover or a question you want answered? e-mail me at [email protected]


CategoriesChess For Beginners

Chess Noob #17: Mating with a King and Rook

Sooner or later in your chess games, you’re going to have to learn how to win with a limited number of pieces.  It may even be down to you having 2 pieces (for the sake of this blog a King and a Rook) and your opponent is left with only 1 piece (a King).

There is a 50-move rule in chess… that if each opponent makes 50 moves and has not taken another piece in that time, the game is a draw.  So, if you’re down to a King and Rook, and your opponent has just a King, you have only 50 moves left in which you have to checkmate!  The pressure is on!

It really does not matter where the pieces start, you’ve got only 50 moves to win once it’s down to just a King+Rook VS King.  So, for the sake of argument, I’ve placed everything near the center of the board… this will make winning a little harder and more time consuming, but it can be done.  So, here’s our starting position, with white to move:

There’s clearly no way to get a checkmate while black’s king is out in the open and has so much room to run… so we need to force him to an edge (preferably a corner).  How do we do that?

Imagine the Rook as a post for an invisible fence.  The black king can never cross that fence (IE any of the squares the rook controls… which in our starting position would be any of the squares along the D file or any of the 4th rank).  If you can make the the king more and more confined, you will win.

BUT REMEMBER, black has 3 goals at this point.  Goal 1) try to last 50 moves to make the game a draw. Goal 2) try to take the rook, so that only the 2 Kings remain, making the game a draw. Goal 3) get put into a stalemate for a draw.

As white, you must stop this at all costs.  You’ll be using your Rook to make the invisible fence smaller and smaller and your king to (at first) protect the Rook and then later to cut off a square from black’s king to make checkmate possible.

Let’s take another look at the starting position:

We need to make Black’s possible squares smaller, but we can’t just yet because if we move the Rook right now, we’ll be giving the black king MORE space… so first let’s move our King to keep the Rook guarded, and we’ll make the fence smaller on the next move.  Let’s go with Kc4.  My chess computer then does Ke6.

Now we can make the “fenced area” smaller with Rd5. Then black moves his King (my computer did Kf6).

Now it gets SLIGHTLY tricky, but don’t worry.  The next move needs to be a King move (we don’t want to move the Rook because then we’ll either a) put it in danger or b) give black more freedom.  We also want to keep our King on the opposite side of the “fence” so that black can never use our King as a shield to get past the fence.  So we’re going to do Kd4. Black does Ke6 and we do Ke5 to force black’s King further in the corner.

It doesn’t matter what black does.  Our goal remains the same: give black less room to move and keep the rook safe until the mate happens.  In the end, we get to this position (with black to move) just a few moves before the mate:

Black’s only 2 squares left are h8 and h7.  He HAS to go to h7 now.  We want to keep him in this micro-sized jail cell so we’ll walk our King around the back with the following:

1) Kg5…Kh8. 2) Kf6…Kh7. 3) Kf7…Kh8

See how we’ve kept black trapped in and just kept our rook safe while we walked around to a better position for our own King?  Now comes the winning move of Rh6#:

Set it up and try it yourself.  Let someone else put the 3 pieces anywhere on the board for you and see if you can figure it out (and remember to keep track of your moves… remember, if you make more than 50, it’s a draw…).  But the plan is always going to be the same: force your opponent’s King into a tighter and tighter space.


CategoriesChess For Beginners

Chess Noob #16 – The Pin


“The pin” is one of the most powerful tactics you can have in your arsenal of attacks.  No, I’m not talking about putting anyone’s shoulders on the ground and there are no 3-counts.  Think of chess more as a war game than anything else… and “the pin” is when you’re attacking so heavily that a piece is “pinned down” and literally cannot move.

Pins can be performed on any piece, making it immobile out of the fear of having the king (or queen, or other higher cost piece) getting captured.  It’s a very simple tactic, but a very strong one at the same time.

One of the most usual pins you’ll see is a bishop pinning a Knight.  It happens very frequently in games, and in many openings you’ll see a position that looks something like this:

The knight can’t move because black would be putting himself in check by doing so.  A normal response would be to push the A-pawn to cause the bishop to retreat.  White can of course (and often does) take the knight forcing black to double up his pawns in the c-file, but not always.

You’ll also, a lot of time, see a similar bishop-to-knight pin where the bishop will capture the queen if the knight is moved.  This can be seen here:

The Bishop, however is not the only piece that can create pins.  Here are a few other powerful pin examples:

Here, white has black’s knight at F7 pinned… HOWEVER, black has a much more powerful pin.  Black is checking white with the Knight at F2.  White would LIKE to take the knight with his Rook, but the Rook is pinned in place by black’s Queen!

And can you see in this one that Black’s Queen is a gonner no matter what Black does?

In these examples, the pin was due to a check that would occur if the piece moved.  That’s not always the case.  In this next example, a lesser piece is pinned because a more powerful piece would be taken, making the pinned piece an easy target:

Black would LIKE to either take the pawn at f4 or push to e4 to make White’s Knight retreat.  If he does either of these moves, however, he will lose his Rook!

Pinning a piece down for threat of either a check or winning a larger piece is a good way to make your opponent’s troops immobile and in many cases win material.  Be on the lookout for pin opportunities for both sides of the board.  Yes, you want to try to pin down your opponent’s pieces, but remember, they want the same thing!


CategoriesChess For BeginnersChess Puzzles

Chess Noob #15- The Fork

“The Fork”, believe it or not, does NOT have anything to do with the widely used eating utensil!  The fork, in chess, refers to when a piece is in a position that it threatens two pieces simultaneously. This may also include putting your opponent in check while attacking another piece (this is a highly effective tool to add to your arsenal).

While the Knight is the most popular piece to fork with (since it threatens pieces that can be nowhere near one another at the time), every piece on the board is capable of forking 2 pieces, given the right situations.  Let’s take a look at some popular examples of forking with each piece that you will likely see in your games.

Popular Knight Forks

The Knight is the easiest piece to fork with. Given it’s unusual moving pattern, it has the ability to threaten pieces that are nowhere near one another and aren’t even lined up in any way.

A highly popular use of the knight fork is to place the opponent in Check, while attacking a piece.  In this case, Checking and threatening a Rook.  Black will not take the Knight because he’d lose his Queen.  Instead he’s forced to move the King out of Check, allowing white to take his Rook.

On the other side the board, you’ll also often see the Knight used to fork the Queen and a Rook, forcing the opponent to chose the lesser of two losses.  You’ll notice the Knight is also threatening the e-pawn (though the e-pawn is defended).  Just imagine how much forking-power the Knight has given it’s “L-shape” pattern.  if there were a piece on g5, it’d be threatened right now as well.

Popular Pawn Forks

The Pawn may be the least powerful piece on the board, but by moving straight and attacking diagonally, it can create some pretty powerful forks such as the one seen in the diagram below (that I’ve seen FAR too many “chess noobs” fall for):

Black is now going to win a bishop or Knight, making him up a pawn (losing a Knight for taking a pawn and either Knight or Bishop).

To see if you’ll be able to do a pawn fork (or might fall victim of one), look for pieces that are on the same rank as one another with only one space between them (as the Bishop and Knight are in the above example).

Sometimes, the Pawn fork won’t always be so easy to see as it might need a little setup.  For instance, consider the next diagram:

Remember, to find a possible pawn fork, look for two pieces on the same rank with only one space between them.  See those two knights white has on the 5th rank?  It’s black’s move.  What black WANTS to do is push his f-pawn to fork the two Knights.  His Queen is in the way, however.  Easily solved: just move the Queen.  But most places you move the Queen will give white the chance to get out of the fork threat.  So how can we still do it?  Force white to move a different piece here.  So, we’ll do 1. … Qxf2+ which forces White to do 2. Kxf2 which then allows us to do 2. … f6, forking the knights.

All the Rest

All the other pieces can also perform forks, but they are all much less frequent as the pieces must be in line with how the piece is able to move.  So for a Rook, the forked pieces both have to be on horizontals or verticals with one another:

Diagonals for the Bishop:

Or for the Queen virtually anywhere she’s able to move to


CategoriesChess For BeginnersChess Puzzles

Chess Noob #14- The Pawn Square

So you’ve played an awesome game and now it’s down to a King and Pawn(s) VS King (and Pawn(s)) endgame!  Who will win? How can you figure out the win without making the moves?

The answer to both questions is one word: COUNT!

When you get down to just pawns, a lot of the time you can figure out the outcome just by counting squares.  You’ll still need to do analyzing (“This move works if he pushes the pawn, but what if he moves the king first?”), but for the most part if you count the spaces you can solve the problem before it becomes a problem.

Who wins here?:

Answer: White!  Yes, Black will get it’s Pawn promoted first, but then white promotes with check and takes black’s new queen as soon as black moves his King to safety.

But it’s not always about Pawn races.  Often times, it’s just a case of “can I promote my Pawn before my opponent can capture it?”

So who wins here where there’s just a Pawn racing a King?:

Answer:  Black will take out white’s Pawn before it gets promoted. This game is now a Draw!

Here?:

Again, it ends in a draw.  White WILL get it’s new queen, but then black takes it for a draw.

And here?:

This time white wins.  Black won’t be fast enough to get to the Pawn before it promotes, nor will it be able to take the fresh Queen.

So how can you tell just by looking (without playing it out) if a pawn will get to the back rank before the opposing King can capture it?  We create…

THE PAWN SQUARE

From wherever the Pawn is, moving toward it’s hopeful promotion, we must create the Pawn square.  The Pawn square is an imaginary box that is as wide as it is tall.  The height of the box is from the Pawn to the back rank it’s trying to get to.  The width is the same number of squares as the height (so, also, the number of squares the Pawn needs to go to to become promoted).

If the black King is anywhere inside the Pawn square, it will capture the unprotected pawn.

SO, using our earlier examples, in each case the pawn has only 3 spaces to go until it is promoted, so the Pawn square will be 4 spaces by 4 spaces (because we need to include the space the Pawn is starting on).

So our first position’s pawn square looks like this:

See that the Black King is in the Pawn square.  It will therefore capture the pawn before it gets to the end.  In fact, along the X axis, the King is at space 2, and will therefore capture the pawn when it’s on space 2 for the Y axis (sorry for bringing up high school algebra!)

In the second example, the King is on space 3 and will capture the pawn on it’s space 3 (just after it becomes a Queen):

But in the final example, the King was not able to catch the Pawn.  Why?  Because it was just outside the Pawn square, and therefore cannot catch up to the Pawn.

So whenever you have an unprotected Pawn racing for the back rank and it’s only threat is a King trying to catch up to it, you can now decide who will win!  Simply imagine a Pawn square.  If the opposing King is inside that square when you begin your mad dash, you will lose!  If he’s outside the square, then make a run for it with the knowledge that very soon you will have a new queen on the board!

Have a topic you’d like me to cover or a question you’d like to ask? send me an e-mail at [email protected]

CategoriesChess For Beginners

Chess Noob #13- Assume Your Opponent is Better Than You

I was originally going to write this article telling you that when you play chess with someone, you should behave as if you were playing chess with yourself.  Then I realized this might not work out so well, because when we play chess with ourselves (where we’re playing both sides of the board), we sometimes go in knowing which side of the board we want to win as, and so we may make moves for the other side not as strong as they could be.

So, let’s scrap that idea entirely.  INSTEAD, let’s say that when you play chess with someone, assume they are better than you.  This will make you think long and hard about making a move “because if they do this, I’ve got them!” and realize “Oh, but if they do this instead, I’m dead!”  Many people call this “hope chess”, making moves in the hopes that your opponent will make the wrong move that will allow your grand plan to come true!

Do not play hope chess!  Assume your opponent is better than you, and that they will therefore see at a glance exactly what your plan is!

So, if they always know what your plan is and how to stop it, how can you ever really make a plan?

Keep searching the board until you can come up with a plan that forces your opponent to make certain moves! If you’re coming at them in such a way that they literally HAVE to make the moves you want, then they’ll never get to make the moves THEY want!

So how do you do this?  Certainly it can’t be done on every single move, but every once in a while you’ll be able to find the right combination.   After all, you’re ASSUMING your opponent is better than you… that doesn’t mean they actually ARE!  Everyone makes mistakes in the game of chess.  Look for those errors and figure out ways to take advantage.

But don’t make a move because you expect your opponent to make a mistake or think they might (or HOPE they might).

But what about traps?

A trap is a trap because your opponent doesn’t see what they’re walking into.  Piece sacrifices (which we’ll get into soon enough) are a form of trap that in some cases are too sweet to miss up… unless your opponent knows that trap too!  Which again, you should assume they do.

Have a topic you’d like me to cover or a question you’d like to ask? send me an e-mail at [email protected]